Travel

Recommended Must Have Travel Apps!

must have Travel Apps

I don’t like to get too bogged down with 100 apps on my phone when I travel, and there are SO many out there to choose from, BUT I do have some favourites that were a life saver at one time or another during my travels! Here are some that were really useful while on the ground during our recent trip to the UK & Europe and in North America last year. Do you have some faves that I’ve missed? Leave a note in the comments.

  • WISE travel card. So this is more than just an ap, it’s how you will use your money when you’re overseas.I research loads of travel cards and this one came out on top. There is a really handy app for viewing transactions, loading and transferring funds. 3. You can can also load into Apple Pay. It’s just like a regular credit card but with VERY low fees. Amazing! You can sign up for a wise card HERE,.

  • XE - Currency exchange calculator. So good for figuring out the cost in your own currency! Probably my most used app overseas. You can pre set your top currencies too.

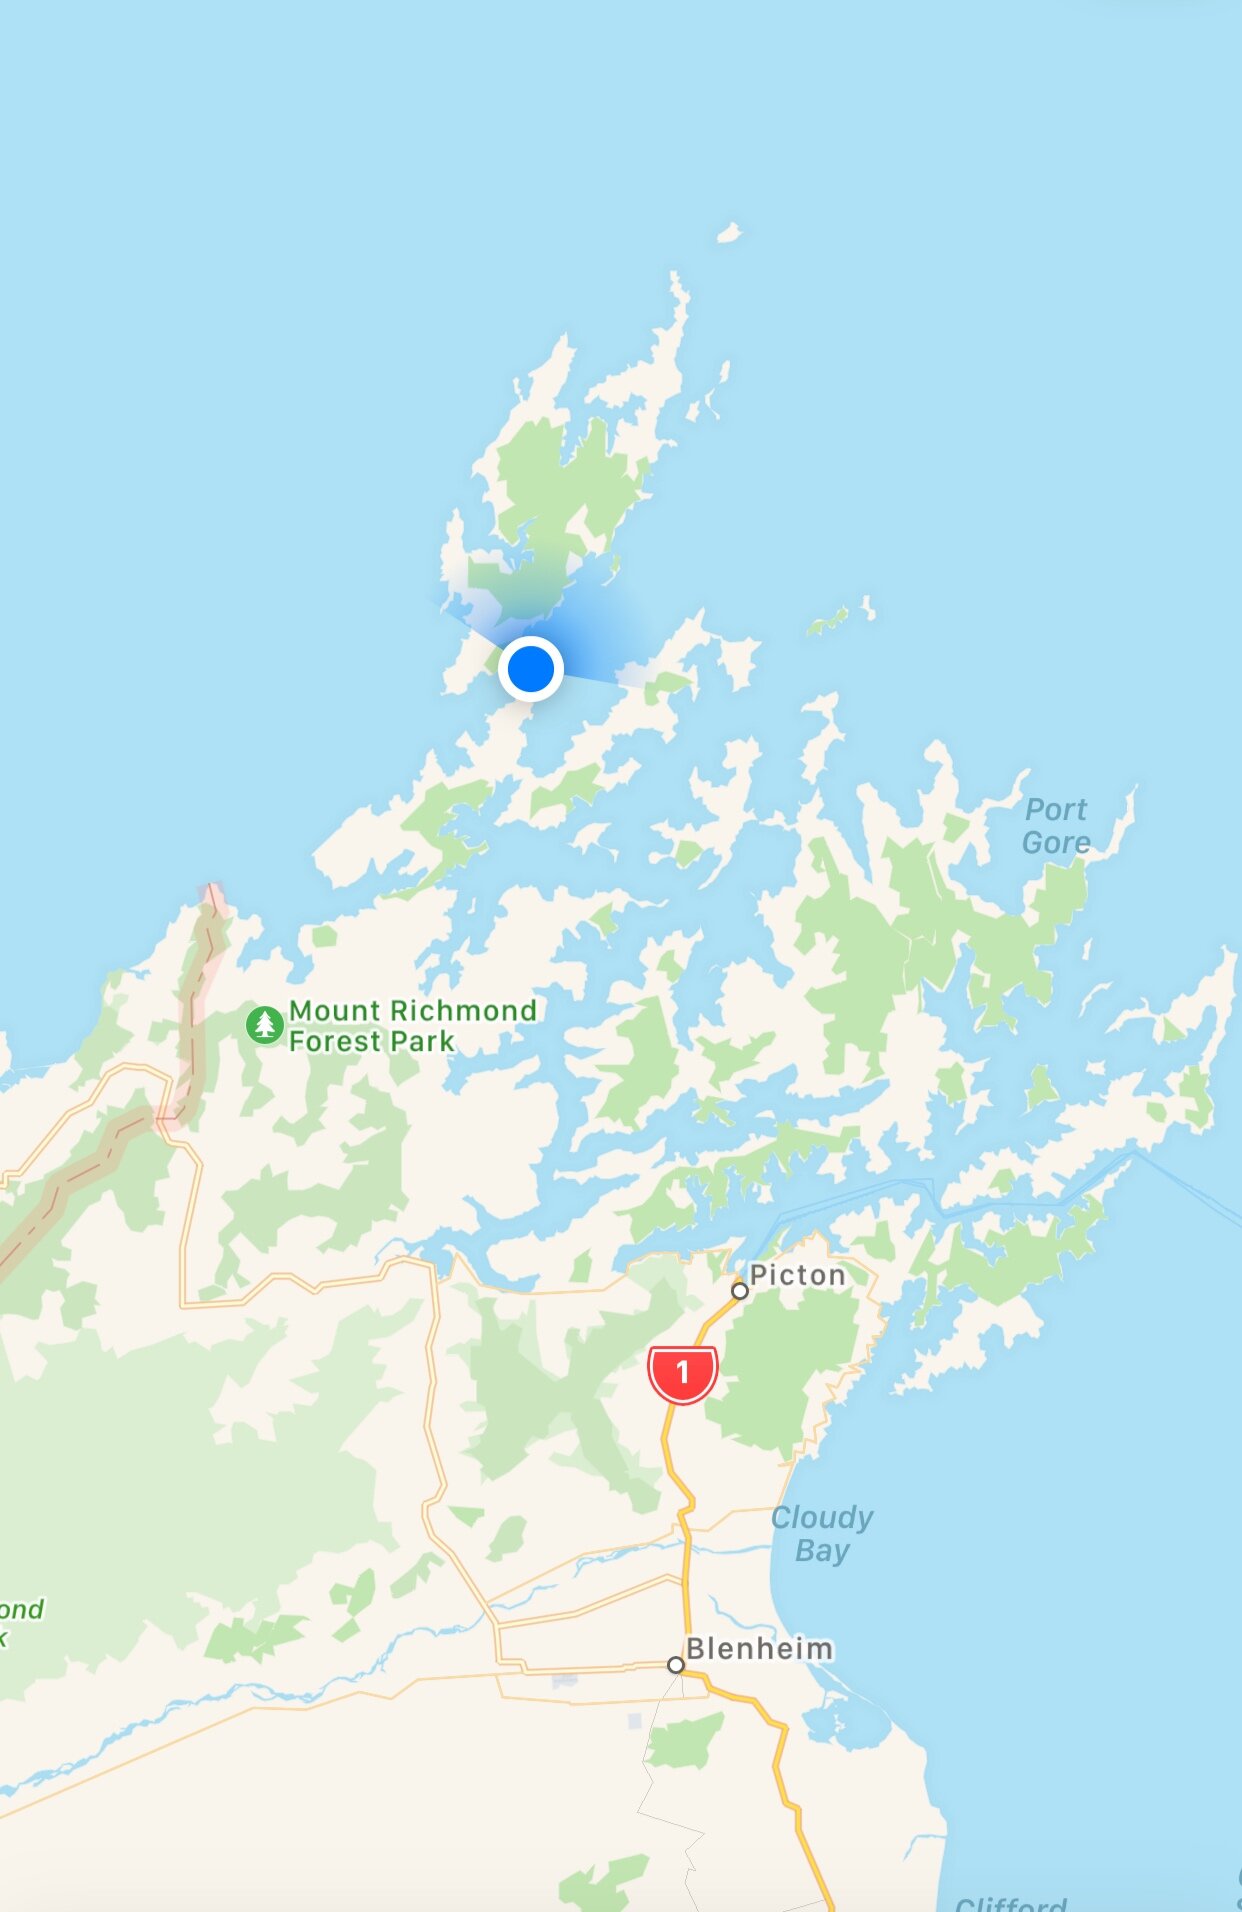
  • Apple Maps or Google Maps - OK, so you likely already have this on your phone... but did you know you can download offline maps to use when you’re out and about with no data? I also use google maps on my laptop a lot when in the planning phase to figure out distances and time between destinations.

  • Maps.Me - an alternative if you’re not a google maps fan, this is a great app that has offline maps for all around the world. Pre download the ones you want and away you go!

  • Citymapper - A public transport app with live timing for most major European cities. I didn’t actually use as much as my old faithful apple maps as I found google had this as well, but a great alternative and a bit more in depth. Definitely download if you intend on using a lot of public transport.

  • TripIt - If you want to put your Itinerary into an app that’s free, this is a great one. It’s super easy to add items in the app or on your desktop, or you can just forward your confirmation emails from bookings to a special email address and it adds everything for you. Format is great, nice and clean - can also be printed.

  • Uber - have this downloaded and ready to go. Uber is not available everywhere but for the places it is, it’s handy from the standpoint of where your destination is already loaded by the time you get in the car, so you don’t need to worry about a language barrier.

  • Transportation apps - I always download train or route planner apps for the country or city I’m going to. For example, if you’re going to Paris, download a Paris Route Planner and it will help you on the metro to figure out what lines you need. I do the same for the London Underground. If you have booked regional train tickets its also a good idea to download the national rail app so you can load in your booking and be updated with any changes.

  • Google Translate - A life saver sometimes! No frills, great app.

  • BlaBlaCar is a ridesharing app that I haven’t used, but its a great concept. Kind of like Uber, but for longer journeys. You can book in someones car who is going the same place as you.

  • Happy Cow - an app to find Vegan and Vegetarian restaurants in our location. This was great for us seeing as my hubby is allergic to dairy, which can be a little tricky in France.

10 Day South Island Trip - Mt Aspiring National Park / Mt Cook & Queenstown

This November we decided to take off to the South Island again, this time with the intention of seeing a little more beyond Queenstown, exploring Aoraki, Mt Cook and getting off the beaten track. We were suffering a little from Covid fatigue, so designed our trip to get away from it all and explore this beautiful country!

We opted for a Campervan trip, which was AMAZING. We love motorhome / campervan travel. It’s relaxed, easy and such a fantastic way to travel. We decided to start and finish in Queenstown, heading North to explore Wanaka, Mt Aspiring National Park, Aoraki Mt Cook, & Lake Tekapo. Here’s what we got up to.

10 Days Explorer Trip - Mt Aspiring National Park / Mt Cook & Queenstown

Day 1: Queenstown to Raspberry Flat
You will be forgiven for never having heard of Raspberry Flat, it’s at the end of a long road that winds through a station and marks the start of the Rob Roy Glacier track. It was a happy accident that this spot was also a designated freedom camping area, which suited us perfectly.

But let me back up. We flew from New Plymouth to Queenstown and picked up our 4 Berth ‘Beach’ Maui camper, which was a cool rig. We named her Bertha, picked up our online shopping order from Countdown (forward planning win!) and we were on our way. From Queenstown, which was 25 degrees when we landed, we headed towards Wanaka stopping only for real fruit ice creams. We found Wanaka Lake Aspiring Road, and then turned off google maps as we knew we just needed to keep driving until we ran out of road.

If you have the time, this road is a must. It’s a spectacular journey, about an hour and a half to Raspberry flat carpark, traveling through some of the most stunning alpine scenery. At 27 degrees when we arrived, we couldn’t get over the scenery. Raspberry Flat is surrounded by mountains on every side, it’s the kind of place that makes you feel small. We hung out for the rest of the afternoon and the following morning were up early to do the Rob Roy Glacier track. This was a stunning track, amazing views, I would say medium grade. It’s worth mentioning that you can only go as far as the lower lookout due to avalanche warnings (at the time of writing).

We loved it here, very secluded (although lots of cars of people off on hikes) and absolutely breathtaking. For me, this was up there with visiting Milford Sound or Glenorchy.

Day 2: Raspberry Flat to Wanaka

After doing the Rob Roy Glacier track in the morning, we cooled off in the river (feet only, FREEZING!) and headed back to Wanaka where we had to partake in some Patagonia ice cream at the lake. We then drove the 15 mins out of town to check in to our camping spot for the night, Landescapes Wanaka. This is a very cool spot, different to anything I’ve seen anywhere around the world. Set on 60+ acres, pull up to your secluded campervan parking spot next to a spring fed cedar hot tub for the night. Basically, hot tubs in paddocks with beautiful scenes all around - this was an epic spot. They also hire e-bikes, so we took the opportunity to bike into Lake Hawea on one of the Clutha trails. Central Otago has so many amazing rail trails, we loved the gentle cycle along the river and canals, ending up at the most stunning alpine lake, Lake Hawea. All up we cycled around 20kms, and ended up back at our campsite just in time for home made burgers and a long soak.

Day 3: Wanaka to Aoraki Mt Cook

We all enjoyed another hot tub in the morning before breakfast and then hit the road North towards Mt Cook. The scenery was stunning as we drove to Twizel, and on to Lake Pukaki. We packed the boys fishing gear on this trip, pretty determined to slow down and hopefully catch some fish! We stopped at on the shore of Lake Pukaki for a dip (me) and fishing. We were treated to the most amazing views of Aoraki Mt Cook across the water thanks to a cloudless day. In the afternoon we headed towards Mt Cook, having booked the night at Glentanner Holiday Park, which is about 10 mins from Mt Cook Village. The road to Mt Cook is just stunning, we stopped several times to take photos and enjoy the view! Once at Glentanner, we parked up and enjoyed our surroundings, plus board games and dinner. We had a great view, the park is excellent. Great facilities, really nice spots for tents or camper vans and lovely views.

Day 4: Aoraki Mt Cook

The only plan for this day was to hike and enjoy Aoraki / Mt Cook. I did a lot of research on walks in the area, and couldn’t resist doing the Hooker Valley Track - which also happens to be New Zealand’s most popular day walk. The hike is 10kms, includes stunning mountain views on all sides, suspension bridges, glaciers, and the best views of Mt Cook you will get. We loved this walk, I cannot recommend it enough. Definitely my favourite day walk that we have done. It is an easy grade, a few little ups and downs, but it’s a great, well marked track. Pack a lunch like we did and stop for a bite to eat at the end of the track, enjoying incredible views of Mt Cook in front of you before you head back to the carpark. Enjoy the photos!
We stayed the night again at Glentanner.

Day 5: Aoraki Mt Cook to Lake Tekapo

The drive from Mt Cook to Lake Tekapo is stunning. We left our scenic overnight spot late morning and headed towards Lake Tekapo, stopping at the Canals for a spot of fishing along the way. Upon arrival at Lake Tekapo, we visited the infamous church and were so lucky to see all of the lupins in full bloom. It was stunning.
We decided to stay at Lake Tekapo Holiday Park and opted for a spot up high on the banks, which had great views out to Lake Tekapo. One of the reasons we wanted to park up here for the night is it is only a 5 minute walk to Tekapo Springs, a really lovely hot springs spot which we really enjoyed. There were nice views out over Tekapo and the water was beautiful.

Day 6: Lake Tekapo to Lake Dunstan

Today we drove from Lake Tekapo to Lake Dunstan, not a lot of kilometres, but we spent a while getting there… stopping to fish once again (this time in Twizel) and heading off the beaten track to visit the Clay Cliffs at Omarama. I actually heard about this spot via an instagram follower who said it wasn’t to be missed. We headed down a gravel road, and then onto private land ($5 at the gate to enter). We were amazed by what we found at the end of the gravel road - the Clay Cliffs are geological wonder; 'bad land' sharp pinnacles and ridges separated by steep and narrow ravines. It was very cool. We then made our way towards the northern end of Lake Dunstan, where I had heard about a good freedom camping spot. We parked up at the Bendigo freedom camping area, which offered a lot of great little spots to park or pitch a tent for free. Good toilets and recycling. It is on the side of the road, but the traffic noise was minimal. We enjoyed our last night in the camper here.

Day 7-8: Queenstown

Heading back to Queenstown to drop back our Maui campervan and swap for a car, we were very excited to check into Hotel St Moritz in Queenstown. We went from one end of the scale to the other, checking into a 5 star hotel! The Hotel St Moritz is a beautiful hotel, sitting just above the lake, it’s a quick walk into town or down to the lake for a walk. We loved the location. We booked a 1 bedroom suite with small balcony and the views were amazing! We spent the next 2 days in Queenstown. We were lucky to mostly dodge the rain and got some fun in!
Whilst in Queenstown the boys did the Shootover Jet (so much fun!) & The Odyssey Maze which was highly recommended to us as a wet weather option.

Queenstown Eats:
Yonder (amazing breakfasts)
Blue Kanu - our fave dinner spot
Flame
White & Wongs
Ferg Bakery
Botswana Butchery
Margo’s Mexican

Glenorchy / Routeburn Track Day Trip from Queenstown
It’s well known that the road to Glenorchy from Queenstown is one of the most beautiful drives in the world. It’s stunning. This day we got to experience it in a different way, with low lying cloud and mist hanging in the valleys. Our plan was to head beyond Glenorchy, to the Routeburn track trail head which has a few day walks. This is a great option for anyone who wants to experience the stunning Routeburn track without actually doing the full multi day walk. We did the loop, which was about an hour and a half, and we really loved it. What a magical part of the Sth Island and the world. A wonderful walk, highly recommend.

Day 9-11: The Camp, Lake Hawea

I love a good instagram find, and I was so excited to stay at The Camp at Lake Hawea. A beautiful camping ground on the shores of Lake Hawea, and a quintessential kiwi camping experience. I’ve never been to a camping ground quite like this. There were plenty of tall trees and open meadows for parking or camping in, but what made it unique were the very cool little ‘communities’ set up for clamping. They have a Belle Tent Village, with cute little belle tents already set up for your glamping experience (complete with commune fire pit), and the very cool ‘Denver Cove’ with Colorado tents all set up with a shared kitchen hutt as well. There is even an area elevated above the park with Domes, plus a food truck on the weekends, bike rentals and more. We stayed in the Safari Tent, tucked away at the end of The Camp, with views straight out over the lake. Unfortunately we had terrible weather, but it was clear just for long enough when we arrived to be able to wonder around and enjoy the view before we hibernated for the next day in our tent with the heater on. It has THE coolest nook for kids, Aiden said it was the coolest place he’d ever stayed.

We loved the chance to slow down here, and promised to make it back in better weather… and for longer.

On day 11 we headed back to Queenstown and flew home to New Plymouth via Christchurch.

Rotorua Family Adventure

This trip was sponsored by Destination Rotorua who hosted our experiences in Rotorua.

What destinations come to mind when you’re looking for an adventure filled holiday in NZ? In the North Island where I am, it has to be Rotorua! Rotorua has long been the Adventure Capital of the North, so when my little fam was invited by Destination Rotorua to come and experience some of what Rotorua has to offer, we jumped at the chance. We decided on a long weekend so that we could fit in as much as possible, taking Monday off work and school. I’m so happy we did that, it allowed us that little bit of extra time to take things slow and enjoy each place without feeling rushed.

We absolutely LOVED Rotorua, I know it sounds really strange, but I had never really stopped to appreciate how beautiful it is there. There are so many stunning lakes (many with their own lakeside walks), the Redwoods were amazing (more on that in the itinerary)

On Arrival - Dinner at Terrace Kitchen followed by The Redwoods Treewalk
Terrace Kitchen, 1029 Tutanekai Street, Rotorua
Redwoods Treewalk, 1 Long Mile Road, Whakarewarewa, Rotorua

After a 4hr drive from New Plymouth, we arrived hungry and ready to fill up on delicious food! I had heard that Terrace Kitchen was the place to go in Rotorua so we headed there. First of all, I LOVED the fltout of this cool spot. It was gorgeous, clever and welcoming. After being seated under the neon sign, we ordered far too much, and then of course we ate far too much. The food was homely, delicious & un pretentious. Highly recommend the chicken salWe all loved our meals and with happy bellies we headed off to the Redwoods Treewalk.

I had been told by many people that we HAD to go and do the Redwoods Treewalk, with many saying that the night time experience was their fave. We arrived at about 8.30pm, it was a balmy evening before daylight savings had finished and was nice and dark. This installation of lights & lanterns amongst the tall redwoods is nothing short of magical. We walked from tree to tree along the suspension bridges for over and hour and all thought it was so well done, fun and different. The huge lanterns with their lights filtering through on the trees were my favourite, going on the highest walk was Aiden’s! It was a lovely welcome to Rotorua.

Day 2 - Morning: Skyline Rotorua
178 Fairy Springs Road, Fairy Springs, Rotorua

Did you even go to Rotorua if you didn’t do the Luge? Going on the Skyline Gondola up to the Luge is an OG classic to do in Rotorua. It had been so long since Bill or I had been, and it was Aiden’s first time. Of course being 10yrs old, he absolutely loved it, but so did Bill & I.

My advice for this one is to arrive early, lots of people seem to arrive around 11am-12pm but by then we were headed into lunch, so getting there by 9am was perfect. We took our Gondola ride up with some beautiful views of Rotorua, and headed straight for the Luge. We did the 3 ride combo and it was perfect. Turns out Aiden is a speed demon and he was loving racing us both. My fave part of this is actually the chair lift back up, it’s so nice and peaceful and pretty heading back up to the top of the hill. After selecting a few photos the were taken on the way down to buy (gotta do it), we headed to the Statosfare Restaurant for lunch. I never knew this was here!!! I had only even eaten from the canteen area, which is absolutely fine, but if you want a REALLY GOOD lunch, then head into the buffet, it was excellent. Seated high above Rotorua with a window seat, we enjoyed cocktails and a scrummy lunch of fresh seafood, salads, hot roast and of course the desserts. Aiden was allowed 2 servings of mini donuts and pavlova, so it was a good day 👌😂

Day 2 - Afternoon: Okere Falls Track
Trout Pool road off SH 33
After our huge lunch, we decided to head to Okere Falls for a quick walk before our rafting that afternoon. The Okere Falls track is very family friendly surrounded by native bush. We walked for about half an hour, stopping at a lookout to view some amazing falls which we later learned we would be going over on the raft! This track is just down the road from Rotorua Rafting, our next stop.

Day 2 - Afternoon: Rotorua Rafting
761 State Highway 33, Rotorua
This was what I was most looking forward to about our trip! I decided to be brave and book to do this because I knew Aiden would love it, and it would push me out of my comfort zone. I have done rafting once before in Montana with a friend, and loved it, so why not?!
Rotorua Rafting takes you over the largest commercially rafted waterfall in the world, a 7 metre drop over Tutea Falls. You read that right SEVEN METERS! You have to look at the photos to believe it, it was WILD.
Aiden could not join us for the first half of the trip as only kids over 13 can do the big drop, but straight after he got to jump into the water and join us. We went over a series of rapids, there was opportunity to get out into the water and drift down some smaller rapids too, it was so fun. Aiden got to ride up front and had a huge smile on his face the whole time. Would definitely recommend!

Day 3 - Morning: Mountain Biking in the Redwoods in Whakarewarewa Forest
Whakarewarewa Forest, Waipa State Mill Road, Rotorua

We woke up early on our final day and headed to Scope Rotorua for breakfast. We were SUPER impressed with the food (and the coffee) at Scope. Dana, the owner, met us on arrival and was super lovely. Everything is made in house and all three of us had delicious meals. Dana also sent us packing with some treats from the cabinet for after our mountain biking adventures - if nothing else, you must try their baked goods!

We headed to Mountain Bike Rotorua for a quick safety briefing and pretty soon were on our E bikes ready to take on the trails. This is a great idea if you’re looking for something family friendly that won’t break the bank, and super fun. This place is incredible. There are over 140kms of trails in the forest, catering to all abilities. This was my first time mountain biking and I LOVED the ebikes! You still get a great workout, but the motor is there to help you along and it just made it so much more pleasurable. We had such an amazing time and biked for close to 3hrs before heading to Secret Spot for a post ride spa!

Day 3 - Afternoon: Secret Spot Rotorua
Right next door to the carpark for the mountain biking

After 3hrs riding (and me having one small accident, oops!) it was time to soak in our own cedar hot tub at Secret Spot. We had heard so much about it here, and it was really lovely. It was a nice way to unwind after a very active morning. There is a great little food / seating area here as well to chill out at or enjoy a ‘shinny dip’.
PS. Do remember to take your towels as they are not included.

Day 4 - Hobbiton
501 Buckland Rd, Hinuera, Matamata

On Monday we headed home via Matamata so that we could take Aiden to Hobbiton, which was greatly anticipated! The month prior Aiden had watched all of the movies with us, after finishing the books a year before. Bill and I have actually been here twice before. The first time in 2004 when it was just a shell of what it is today. This is world class location and tourist spot! The tour is great and they have done such an incredible job of looking after, and growing the site. After our bus ride in to the property, we wondered along the paths in the shire marvelling at each of the little hobbit holes and the incredible amount of detail and work that goes into each one. We love it here, it’s simply magical! We worth the money if you’re a fan of the movies, and even if you’re not.

All in all, we had an amazing 3 days in Rotorua. It was fun & full of adventure which are our favourite kinds of holidays. Below are a few ideas for other FREE activities to do in the area if you’re wanting to mix it up with your paid activities. Enjoy your time in Rotorua and let me know when you go!

Kerosene Creek - Relax in the naturally heated waters of Kerosene Creek, Rotorua, where hot spring and freshwater stream meet. Approx 35mins out of Rotorua.

Kuirau Park – Corner of Ranolf Street and Lake Road, this is a lovely spot to walk around and view some free geothermal pools. Also a playground for the kids.

Blue Lake Walk - 1.5hr loop, beautiful walking track beside the lake.
Location: Te Ngae Road off Tarawera Road.

10 Day Northern South Island Explorer

I’ve always been embarrassed that I have not seen enough of this beautiful country, so this year with all other overseas plans cancelled, we decided there was no time like the present! We were lucky enough to head to the top of the South Island over these Christmas holidays, and spent time in 3 parts - the Marlborough Sounds, Abel Tasman and the Wakamarina River. What an amazing part of the country!

Here is our itinerary, including the secret little spots we stayed that were amazing!

10 Days Explorer Trip - Marlborough Sounds & Abel Tasman

Wellington to Picton
An early start and 4.5hr drive to the ferry in Wellington and a fantastic crossing on the Interislander. We then stayed the night just outside of Picton in the cutest little cabin, highly recommend!
Accommodation Manuka Manor Rustic Cabin Retreat

Picton to French Pass, Marlborough Sounds
We headed off after a cooked breakfast to French Pass, which is at the top of the sounds. After some research, I had seen there were some great small walks at Peloras Bridge (we did the 1hr Circle track) and at Elaine Bay, which was about 3/4 of the way there. Peloras Bridge was worth stopping and seeing, and the walk was lovely with a suspension bridge crossing included. Very pretty spot. Elaine Bay was absolutely stunning, our first look at the beautiful bays of the Marlborough sound. We did the Piwikawakawa track which I would recommend, the views were beautiful the whole way along and the walk was easy grade, taking about an hour and a half return.

French Pass / Elmsie Bay (2 Nights)
French Pass is the gateway to D’Urville Island and a step back in time. The road out is not for the faint hearted, but it only added to feeling as remote as we were. The scenery along the road is amazing, be prepared to stop a lot to take it in! Elmsie Bay is a gorgeous wee bay filled with kiwi baches, a beautiful beach, wharf and happy kids running around. We were welcomed by a pod of dolphins swimming right up close in the bay, and it didn’t take long for Aiden to put on his togs and run out to swim with the dolphins with the other kids. What an amazing experience for him.
We stayed at French Pass Beach Villas, in the most beachfront apartment they had. It was perfect for us, Aiden was on a mattress on the floor - usually it’s just for couples. It had a little kitchen, outdoor patio and outstanding views out over the ocean. It was pricey, but worth it. We stayed in this magical place for 2 nights over new year and loved the relaxed pace and how abundant it was with sea life. We saw the dolphins daily, stingray, a massive school of krill and fish right off the wharf.

French Pass to Motueka
We decided to stay in Motueka the night before we started our Abel Tasman adventure. It’s only 20 mins or so away and has good facilities there. We took the day to get there, stopping in Nelson for a little tiki tour and lunch by the river. We then drove to Rabbit Island on the recommendation of our waiter, which we loved. Aiden had a swim, I waded and the water was beautifully warm. Next stop was Mapua, another recommendation, a pumping little seaside wharf with some cute shops, cafes etc.

We finally made it to Motueka and stayed in a cute, very eccentric little spot, it was perfect for one night.
it was called Cabins on Tudor Bed & Breakfast.

Abel Tasman
I will confess I found organising the Abel Tasman portion very confusing, so hopefully this helps anyone else wanting to plan a trip there.
We decided to not camp along the way, as this girl likes her home comforts so I set about trying to find accommodation, which was the biggest challenge. There are very few places to stay IN the park. Unless you find somewhere private, the only spot I found was Awaroa Lodge. It’s an amazing little oasis in the middle of the bush, but it cost us. We were visiting over peak time, so we paid top dollar at $470 a night. That’s the most I have ever paid to stay anywhere and it took me a few days to accept that I wasn’t going to find anywhere else and we decided as it was a special trip for us, we would splurge. The price also included an epic full menu breakfast each day. It needs to be said - the food at this place is outstanding.
Price wise, we stayed in peak times - I think other times of year it is much more reasonable. Staying here meant water taxi’ing in and out (which you need to book in advance, we used Aqua Taxi), or walking in and out. So here is the breakdown of how we coordinated 3 days walking.


Day 1: Marahau to Anchorage Bay
Drop bags to Water taxi in Marahau by 9am, then start walk to Anchorage Bay (12.5kms / approx 4hrs). Bags were sent to Awaroa ahead of us. The walk was spectacular and relatively easy, we were picked up by our Aqua Taxi at 1.45pm and taken to Awaroa, which meant we had most of the afternoon to enjoy there. We swam at the absolutely INCREDIBLE Awaroa beach (look up the history of this amazing spot!) and had pizza for dinner at the Pizzeria.

Day 2: Bark Bay to Awaroa (skipped Anchorage to Bark Bay)
We caught our Aqua taxi at 10.30 to Bark Bay, which ended up going on a big tour of all sorts of places (not planned) so we didn’t get there until after 12pm. We weren’t too concerned as we had all day to make our way back to Awaroa lodge. This day was a harder walk, with several uphill sections, most notably just outside of Bark Bay. This was our favourite day though, although more challenging the track was quieter, the scenery amazing and lots of cheeky little Weka and wonderful bird life. We made it back to Awaroa in time for a cold cider at the Pizzeria and a game of outdoor chess, followed by an incredible dinner at the restaurant.

Day 3: Awaroa to Totoranui
We had planned to walk for 3 days (walk Awaroa lodge to Totoranui and then water taxi back, 7kms) but we instead decided to spend the day at Awaroa beach. We knew we would be leaving the next day and hadn’t allowed time to just relax and spend time at the beach - and I’m so glad we decided to do this. We spent the most amazing morning at the beach, swimming multiple times, building dams in the estuary and bathing in the 24 degree sun (with plenty of sunscreen of course!!). It was one of the best days in recent memory. If you stay at the lodge, make sure you allow some time to do this.


Day 4: Awaroa to Marahau
We opted for a late aqua taxi at noon, which got us back to Marahau at 1.30pm. We then drove to Canvastown for the remainder of our trip.

Abel Tasman Tips:
1. The first step is deciding which portions of the walk you want to do. I found this map handout from DOC particularly handy.
2. Decide whether you want to carry all of your belongings and sleep in the doc huts or campground along the way, or whether you want to water taxi in and out. Doing it the later adds significant cost, but for us was worth it. Once you have this decided, you can look for accommodation either in Kaiteriteri or Marahau or stay in the park like we did, at Awaroa Lodge.
3. Make sure you book any water taxi’s in advance.
4. Take your own fixings for lunch & snacks.

Abel Tasman to Canvastown
This drive took a few hours, ending on the Wakamarina River just a few minutes out of Canvastown and 15 mins from Havelock. We had booked to stay at Fossickers Hut, the accomodation I was most excited about on this trip. I found this hut through Canopy Camping, a website I love to peruse when I’m wanting to escape somewhere amazing. This little hut is back to basics, off grid, simple living at it’s absolute finest. Fossickers Hut has been beautifully handcrafted by it’s owners Craig & Jodie. Everything is second hand or has been made. Consisting of a wooden 1 bedroom hut with mezzanine sitting in a perfect spot above the river surrounded by native bush, with an outdoor camp kitchen with everything you need (gas cooker, hot water, lighting etc). There is also an outdoor bath, shower & composting toilet. We spent our days swimming in the crystal clear waters of the river (where Aiden learned to kayak!), playing board games, eating, relaxing, and more eating. Take everything you need to this spot and don’t leave for total relaxation. We thought we might go for a drive to the sounds, but decided instead to stay immersed in this magical place.


This is where we saw out the end of our holiday. On the last day, we drove past winery after winery to Picton which is only an hour away and caught the ferry at 2.45pm.

This was the perfect itinerary for us, with adventure, activity, lots of incredibly scenery and nature an of course, relaxation.


Helpful Sites:
https://www.nelsontasman.nz